Electrical Section
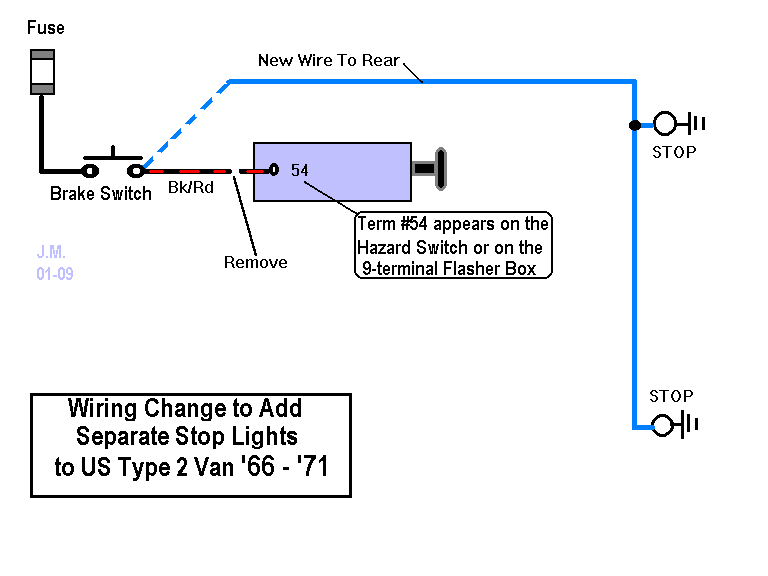
Brake Lights/Tail Lights
![]() Wiring of 2-prong brake light switches
('68/'69) with 3rd switch for warning light.
Wiring of 2-prong brake light switches
('68/'69) with 3rd switch for warning light.
![]() Wiring of 3-prong brake light switches
('70 and later) with warning light connection.
Wiring of 3-prong brake light switches
('70 and later) with warning light connection.
Shows how the warning light circuit works.
![]() Wiring of 3-prong brake light switches ('70
and later). Another view showing the actual plug/socket wiring to
switches.
Wiring of 3-prong brake light switches ('70
and later). Another view showing the actual plug/socket wiring to
switches.
![]() Internal circuit details of later brake
system dash warning lights.
Internal circuit details of later brake
system dash warning lights.
![]() Tail
light wiring: '68 thru '72
Beetle showing wire colors.
Tail
light wiring: '68 thru '72
Beetle showing wire colors.
![]() Tail
light wiring: '73 thru '79
Beetle showing wire colors.
Tail
light wiring: '73 thru '79
Beetle showing wire colors.
Headlights
![]() Wiring of the headlight sockets.
Wiring of the headlight sockets.
![]() Headlight Dimmer Relay circuit '66
thru '70.
Headlight Dimmer Relay circuit '66
thru '70.
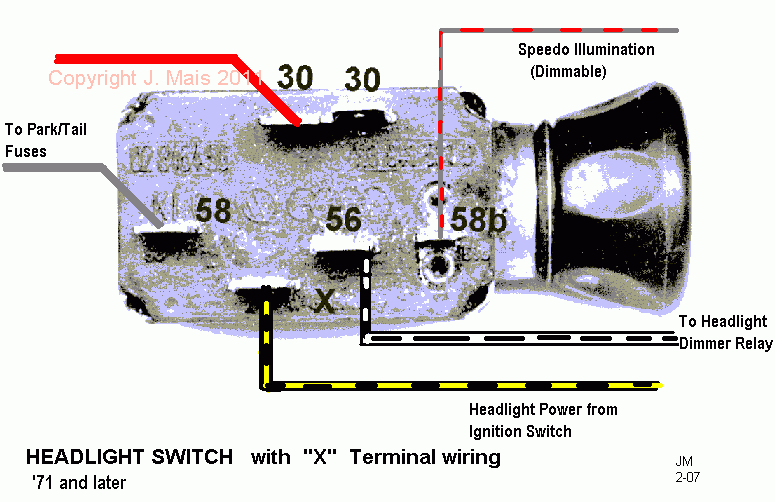
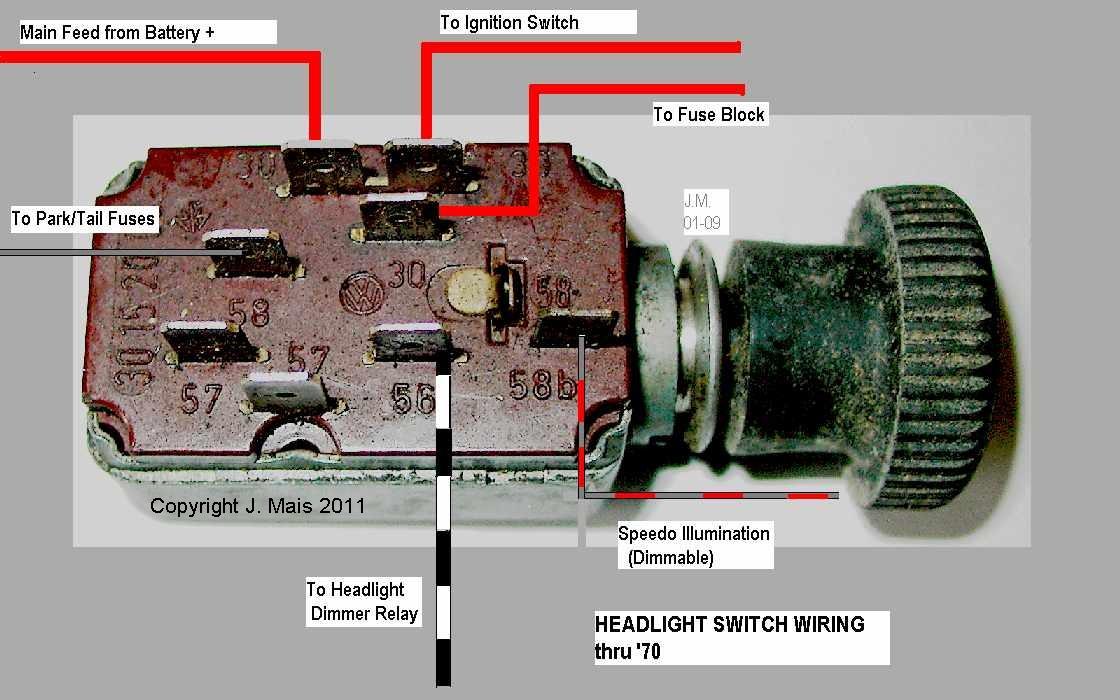 Photo
of Headlight switch, showing wiring.
Photo
of Headlight switch, showing wiring.![]() Headlight Dimmer Relay circuit '71
thru '79.
Headlight Dimmer Relay circuit '71
thru '79.
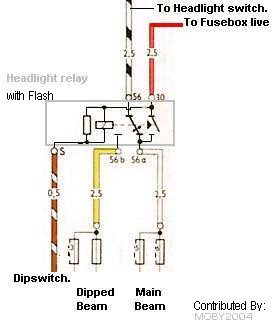 Headlight Dimmer Relay
(5-terminal) circuit used on UK/Euro cars w/Flash function.
Headlight Dimmer Relay
(5-terminal) circuit used on UK/Euro cars w/Flash function.
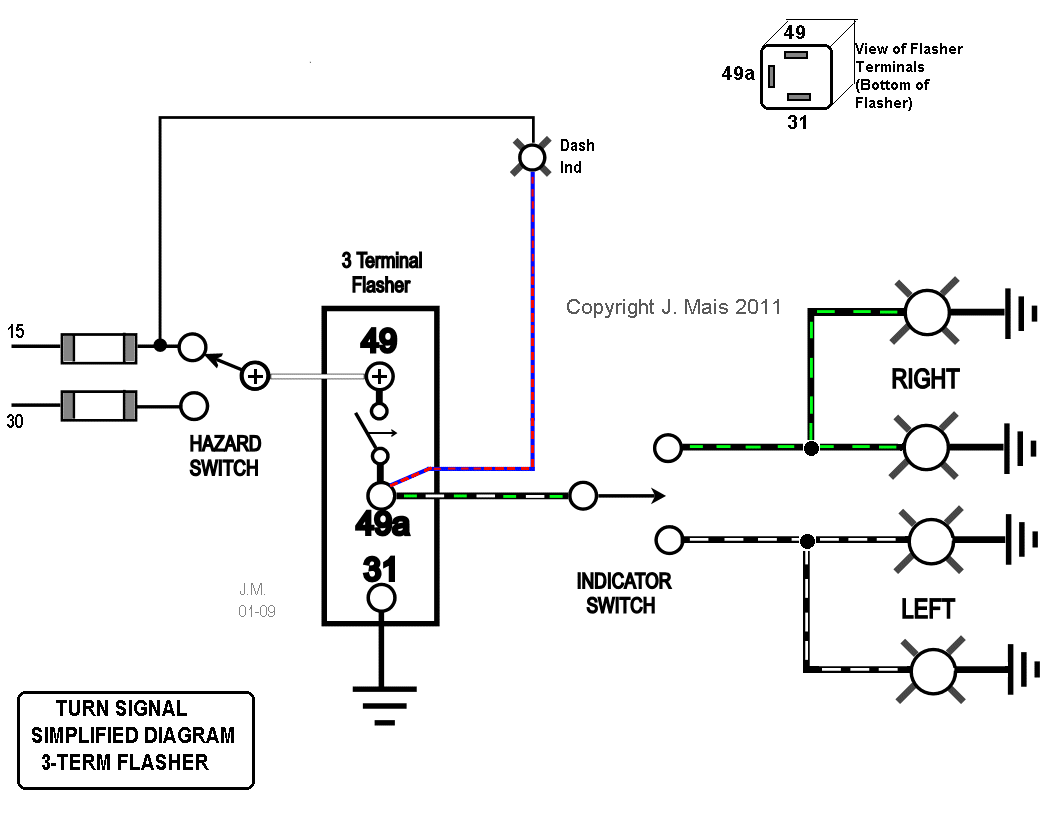
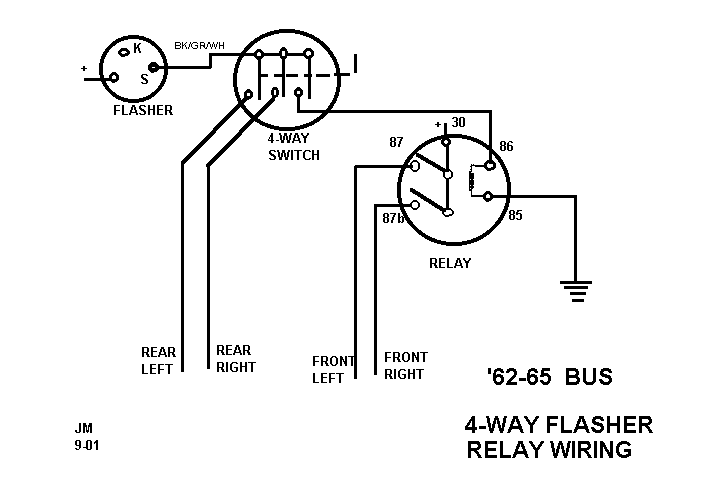
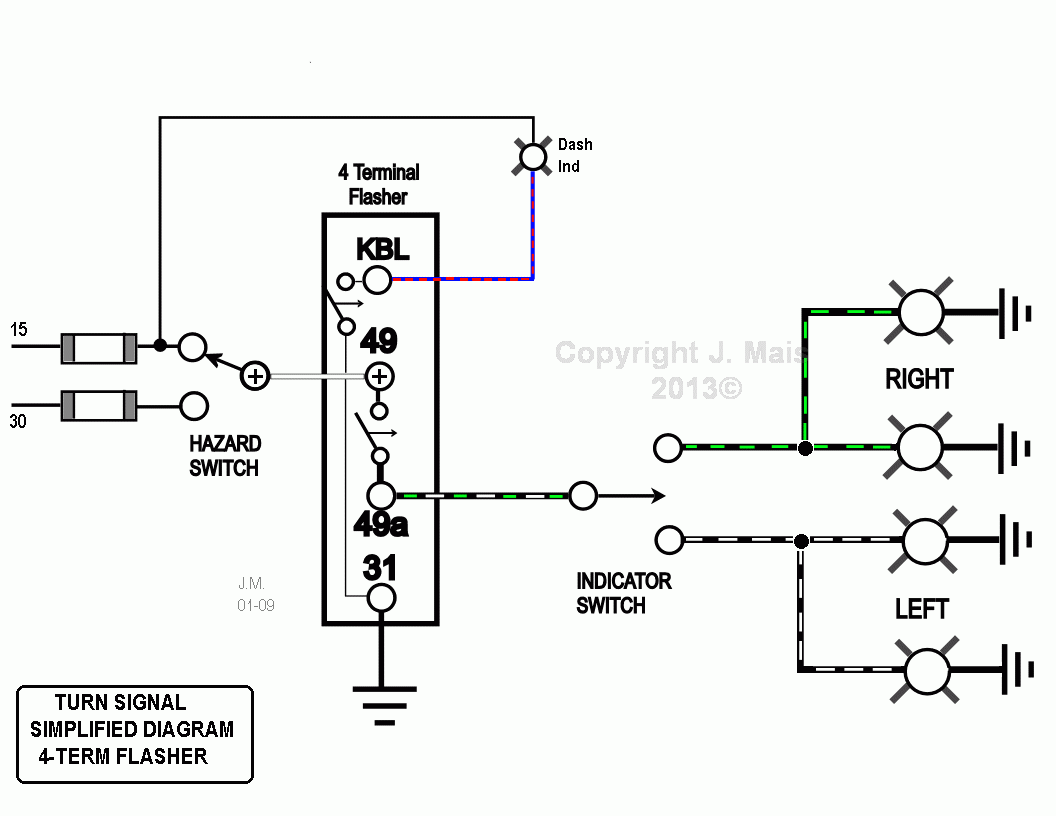
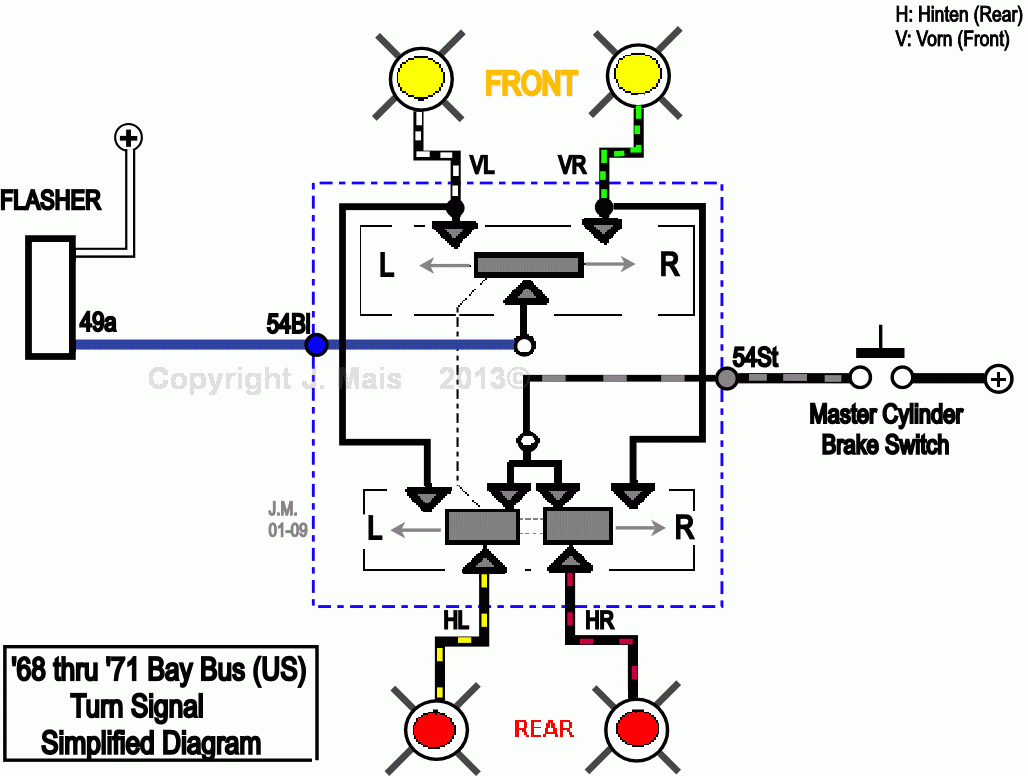
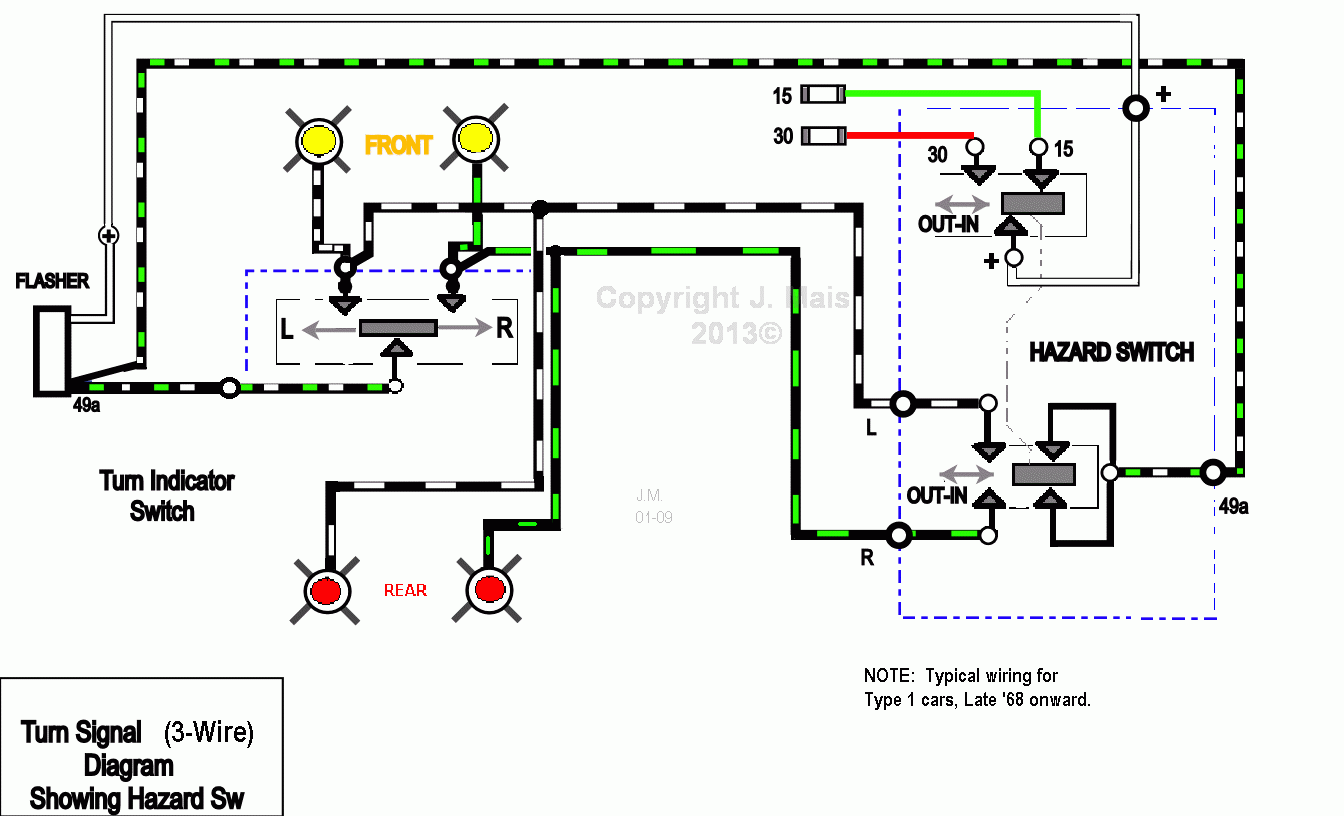
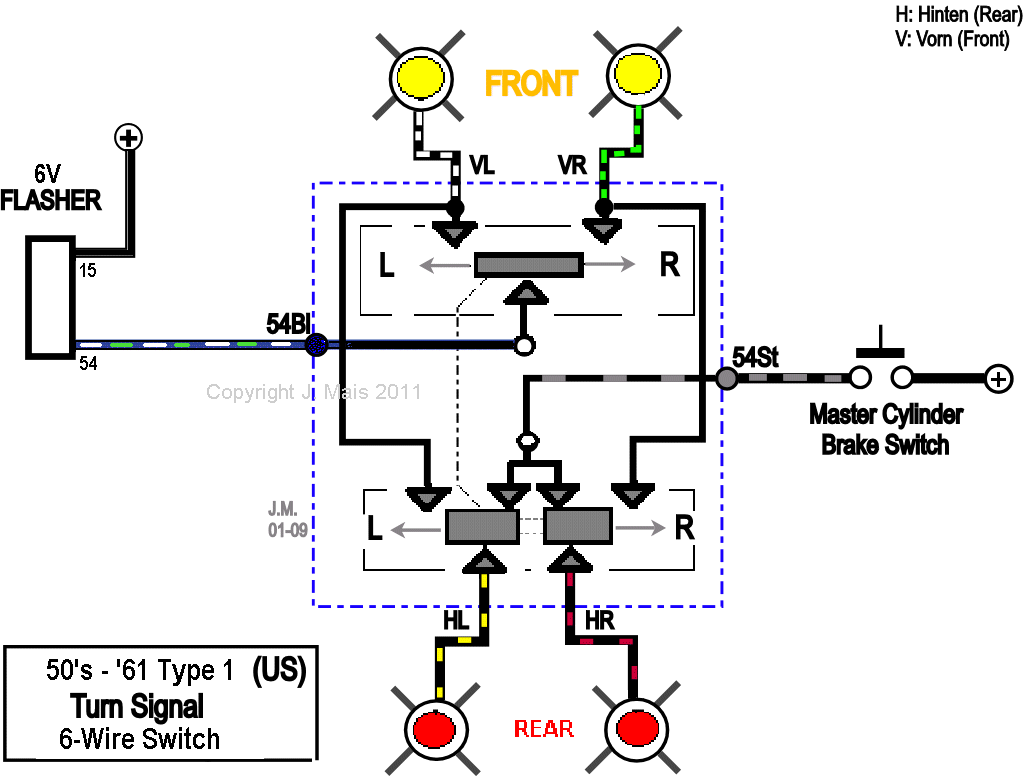
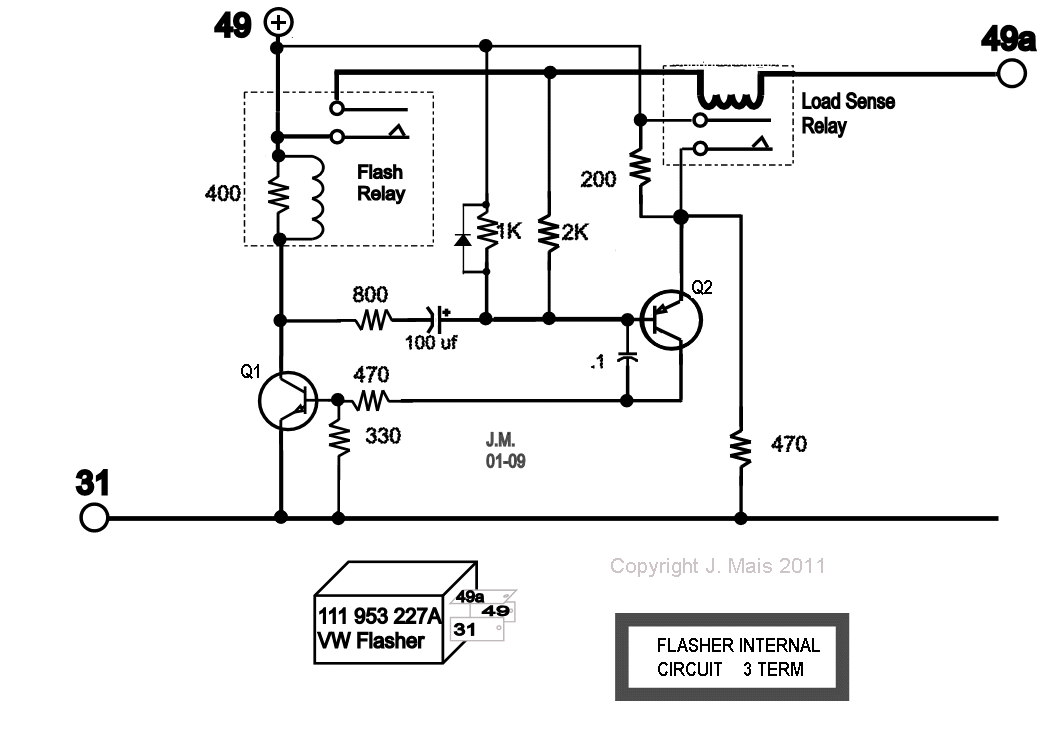
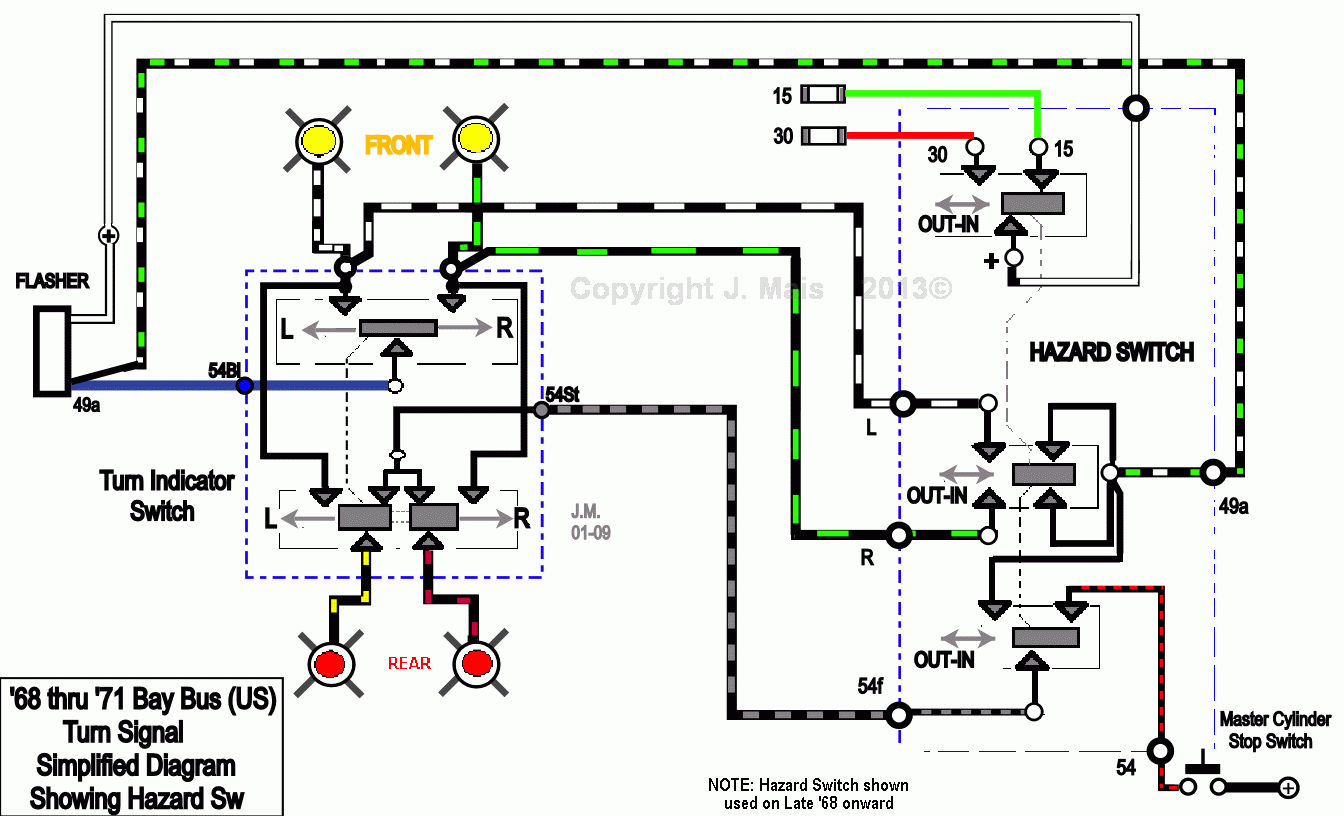
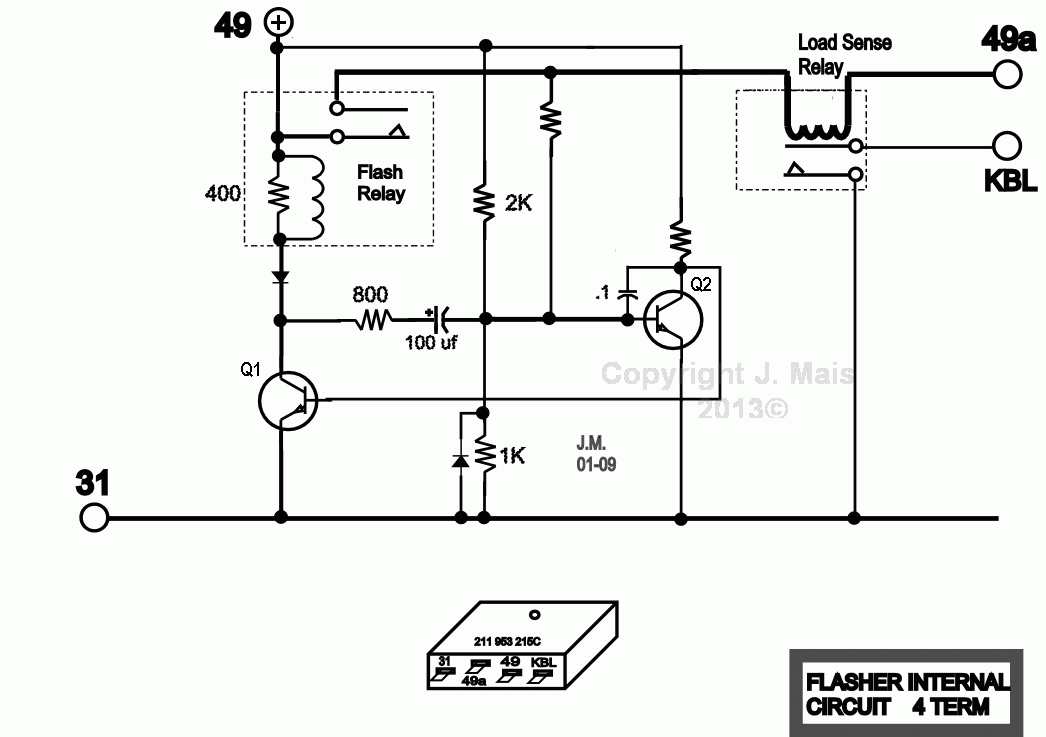
Turn Signal Flashers and Hazards
![]() VW used a
number of different schemes over the years
on both Beetles and Busses. This article explores some of the
more
common aspects of the circuits. Detailed diagrams along with
descriptions
are included for each case.
VW used a
number of different schemes over the years
on both Beetles and Busses. This article explores some of the
more
common aspects of the circuits. Detailed diagrams along with
descriptions
are included for each case.
Quick Links to all of the diagrams (no text):
Fuel Injection
![]() Schematic of Fuel Injection system, '75 -'79 Type
I and Type II.
Schematic of Fuel Injection system, '75 -'79 Type
I and Type II.
![]() Description of Fuel Injection circuit, '75 -'79 Type
I and Type II.
Description of Fuel Injection circuit, '75 -'79 Type
I and Type II.
Windshield Wipers
![]() Wiring of 12 Volt, 2-speed wiper (Steering
column-mounted switch).
Wiring of 12 Volt, 2-speed wiper (Steering
column-mounted switch).
![]() Description of circuit for 12 Volt, 2-speed
wiper (Steering Column-mounted switch).
Description of circuit for 12 Volt, 2-speed
wiper (Steering Column-mounted switch).
![]() Wiring of 12 Volt, 2-speed wiper (dash-mounted
switch).
Wiring of 12 Volt, 2-speed wiper (dash-mounted
switch).
![]() Description of circuit for 12 Volt, 2-speed
wiper (dash-mounted switch).
Description of circuit for 12 Volt, 2-speed
wiper (dash-mounted switch).
![]() Wiring diagram for 6V Single-speed wiper.
Wiring diagram for 6V Single-speed wiper.
Alternators/Generators
![]() How
do I test my Generator ?
How
do I test my Generator ?
![]() Generator to Regulator wiring.
Generator to Regulator wiring.
![]() 6V
To 12V Conversion - Check List
6V
To 12V Conversion - Check List
![]() Wiring diagram for Type I cars with alternator.
Wiring diagram for Type I cars with alternator.
![]() Wiring details for Type I alternator with
external regulator (Motorola).
Wiring details for Type I alternator with
external regulator (Motorola).
![]() Description of Alternator operation.
Description of Alternator operation.
![]() Internal wiring of Motorola Alternator
w/ external regulator.
Internal wiring of Motorola Alternator
w/ external regulator.
![]() Wiring for conversion from Generator
to Alternator.
Wiring for conversion from Generator
to Alternator.
![]() Adding a dash warning light to a Buggy with
Alternator.
Adding a dash warning light to a Buggy with
Alternator.
![]() How
to test for excessive "drain" on the battery.
How
to test for excessive "drain" on the battery.
Miscellaneous
 How
to Test/Troubleshoot "No Spark" condition.
How
to Test/Troubleshoot "No Spark" condition.![]() What
is this plug in my engine bay?
What
is this plug in my engine bay?
![]() Using a 3-wire turn
signal switch with single-bulb tail lights .
Using a 3-wire turn
signal switch with single-bulb tail lights .
![]() How to wire the carb (choke and solenoid) to
the coil.
How to wire the carb (choke and solenoid) to
the coil.
![]() Audible warning circuit for Oil pressure, Generator,
Lights left on.
Audible warning circuit for Oil pressure, Generator,
Lights left on.
![]() Audible warning circuit for Oil pressure, Generator.
Audible warning circuit for Oil pressure, Generator.
![]() Starter /seatbelt interlock wiring on
'74 Type I (How to bypass it.)
Starter /seatbelt interlock wiring on
'74 Type I (How to bypass it.)
![]() Wiring of backup lights.
Wiring of backup lights.
![]() Where is the Backup Light switch located?
Where is the Backup Light switch located?
![]() Wiring of plug for Turn Signal switch ('72 Up)
Wiring of plug for Turn Signal switch ('72 Up)
![]() Wiring of plug for Ignition switch ('72
Up)
Wiring of plug for Ignition switch ('72
Up)
![]() Safety circuit for adding an electric fuel pump.
Safety circuit for adding an electric fuel pump.
![]() Another scheme for adding an electric fuel pump. This one "primes" the pump during cranking, eliminating need for a push button.
Another scheme for adding an electric fuel pump. This one "primes" the pump during cranking, eliminating need for a push button.
![]() Circuit that simulates Term #57
on the Type II Headlight switch.
Circuit that simulates Term #57
on the Type II Headlight switch.
![]() 9-Terminal Flasher explained. This
is a Link to the page written by
9-Terminal Flasher explained. This
is a Link to the page written by
Matt Roberds. Use your browser
BACK
button to return here.
![]() Circuit diagram for rear window defogger
on Type 1 cars.
Circuit diagram for rear window defogger
on Type 1 cars.
![]() Where to jumper on the starter solenoid
to test starter.
Where to jumper on the starter solenoid
to test starter.
![]() An easy way to test the starter under the rear seat of Type 1 cars (12 Volt).
An easy way to test the starter under the rear seat of Type 1 cars (12 Volt).
![]() How to add a dip-stick temperature probe and be able to tell what the dash warning light means.
How to add a dip-stick temperature probe and be able to tell what the dash warning light means.
![]() How to add
a tachometer without running new wires to the engine bay. (Same page as above.)
How to add
a tachometer without running new wires to the engine bay. (Same page as above.)